

The first tumbler I ever engraved took me an hour and a half and it came out crooked. I had it clamped in a jig I built from scrap plywood, and every time I rotated it by hand between passes I lost a little alignment. By the last pass the name wrapped around the tube at an angle that looked drunk. I finished it, handed it over, and quietly decided I was not doing another one until I had something that turned the work for me. That something was a rotary, and the one bolted to my bench now is the xTool RA2 Pro.
The RA2 Pro is a 4-in-1 rotary attachment. Roller rotary, chuck rotary, sphere-engraving module, ring-engraving stud, plus a mini level and a roll of tape in the box. It fits the xTool S1, F1, F1 Ultra, P2, D1 Pro, M1 Ultra and most other laser engravers, and the listing is clear that it has to be used with the riser. It carries a 40W power rating, turns as slow as 36 degrees per second and as fast as 360, and measures 7.4 by 3.7 by 18 inches. Those numbers matter more than they sound like they do, and I will get to why. Here is how I set it up and run tumblers, in the order I actually do it.
Stop hand-turning tumblers between passes
If you engrave more than one tumbler a month, a rotary is the difference between a repeatable setup and an evening spent chasing alignment. The RA2 Pro is the one bolted to my bench.
Amazon Check Today's Price on Amazon →Step 1: Confirm Your Machine and Mount the Riser
The most common mistake I see with this attachment is someone trying to mount it without the riser. The RA2 Pro lifts the work up into the laser's focus range, and on machines like the S1 that means it sits on the riser frame. Without it the chuck sits too low and you cannot bring the top of a tumbler under the lens no matter how you adjust the Z. The title says must with riser and it means it.
Before I ordered, I checked compatibility against the listing: xTool S1, F1, F1 Ultra, P2, D1 Pro, M1 Ultra, and most other laser engravers. Mine is an S1 and the fit was straightforward. If you run something else, compare the 7.4 by 3.7 by 18 inch footprint against your bed and make sure the frame clears your enclosure door when the module is mounted.
The riser came in four pieces with a bag of bolts and a sheet that is mostly pictures. I laid the parts out on a scrap of cardboard, matched the brackets to their holes, and had it together in about twenty minutes with a hex key and a small adjustable wrench. Then I set the assembled frame on the bed and closed the enclosure door to check it cleared. Mine cleared by about half an inch. That is closer than I like, and it is worth measuring before you order rather than after the box is open on your bench.
Then clear the bench. I pull everything off the back wall of the garage, set the shop vac where I can reach it, and lay a scrap of cardboard under the machine to catch tape scraps and fine dust. You will be reaching in and out of the enclosure a lot during setup, and a clean bench saves you from knocking the level onto the floor for the third time.
Step 2: Choose the Right Module for the Shape
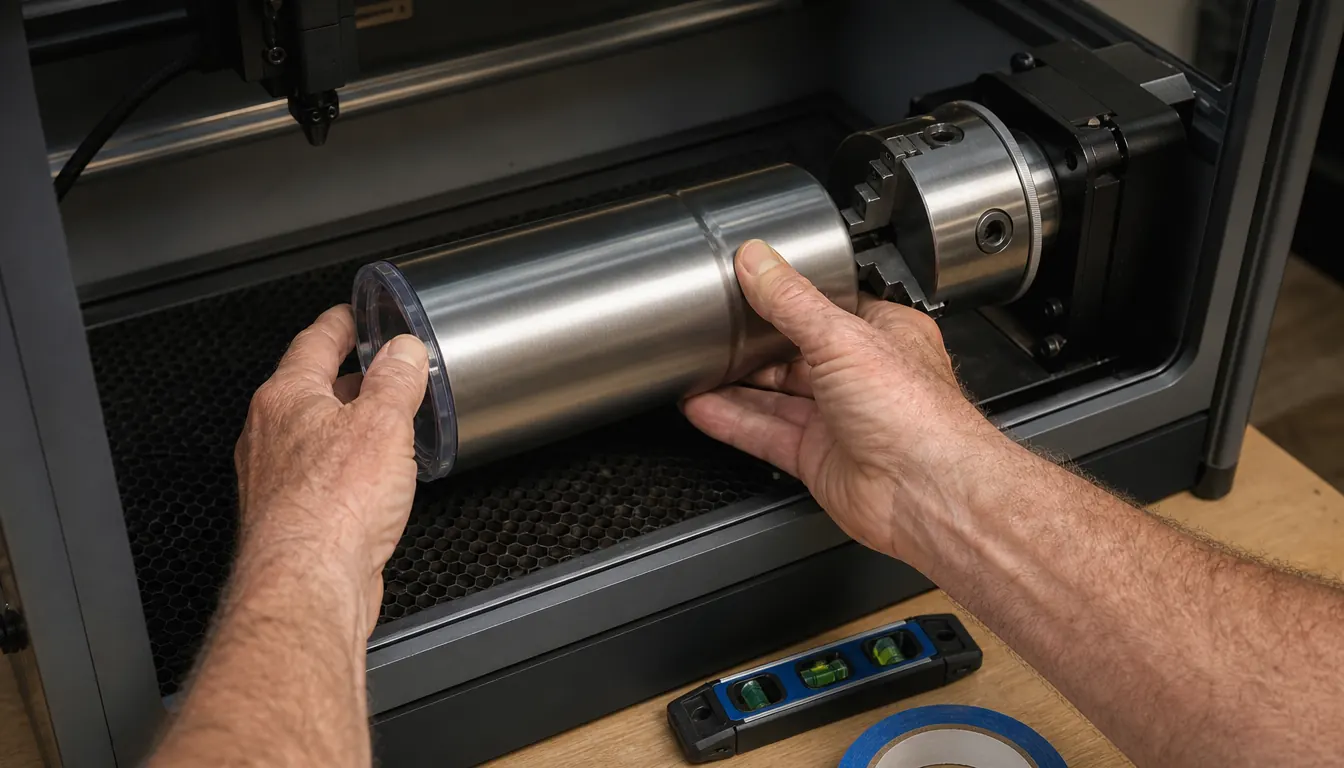
There are four modules and picking the wrong one is how people end up with a cracked tumbler or a slipped engraving. The chuck rotary is what I use for straight stainless tumblers. It grips the base, holds the tube square, and does not care about the taper. The roller rotary is for tapered work and for anything with a handle I cannot chuck without crushing. Wine glasses are the obvious case.
The sphere-engraving module is for round objects, which sounds like the same thing as a tumbler and is not. A sphere sits on the module and turns in place. A tumbler is a cylinder and has to be held on its axis. The ring-engraving stud is for ring-sized work, and I use it more than I expected for leather bands and small metal pieces.
Swapping between them takes a few minutes with the adjustable chuck and a hex key. I keep each module in its own labeled bag in a drawer under the bench. The one time I dumped them all in a box together, I spent twenty minutes matching the ring stud to the right insert.
Step 3: Level It and Check for Wobble Before You Burn Anything
The mini level in the box is not a toy. Hold it across the top of the tumbler, then check the tube along its length. If the axis is not level, the engraving comes out deeper at one end and lighter at the other, and no amount of power adjustment fixes it. Shim under the module frame, not under the tumbler.
I learned that shim trick the hard way on a Saturday in October, working through six tumblers for a church bazaar table. The first three came out clean. The fourth had a pale band along the bottom edge where the burn went shallow, and the fifth was worse. Nothing in my settings had changed. What changed was that I bumped the module frame sliding the fourth tumbler out, and the whole thing was sitting maybe a sixteenth off level. I pulled the frame, rechecked with the mini level, slid a folded strip of card stock under the low corner, and re-ran the last ones on scrap stock before I touched another blank. Now I check the frame level every time I load a tumbler, not once a session.
Then turn it by hand through a full rotation and watch the gap between the tumbler and the lens. A wobble of a sixteenth of an inch shows up in the finished piece as a wave you can feel with a fingernail. The RA2 Pro will spin at up to 360 degrees per second, and at that speed a wobble becomes a blur before you can hit stop.
Tape is your friend on tapered tumblers. A wrap of tape at the far end evens out the taper enough for the chuck to hold it true. It also gives you a surface to mark where the design should start, and it peels off stainless without leaving adhesive behind.
A tumbler that wobbles for one second at three hundred sixty degrees a second comes out looking like it was engraved by a man in a hurry, because it was.

Step 4: Focus on the High Point and Test on Scrap
A tumbler is a curve, and a laser focuses at one distance. Set focus at the highest point of the tube, which is dead center over the top, and accept that the edges of the design will be slightly softer. On a 20 oz tumbler the difference is small. On a wide travel mug it is not, and that is when you rotate the design toward the visible face and keep the text narrow.
Frame the job with the lid closed and the engraver in framing mode, then open it and look. I do that twice, once before the tumbler goes in and once after, because the laser does not know I bumped the chuck while I was reaching for the level.
Bare stainless will not take a mark from most diode lasers, no matter what the settings say. I use a marking compound, brush it on thin, and let it dry to a haze, then run a test band on a scrap tumbler or on the part of the tube that the lid will hide. Only then do I commit to the real piece. That habit costs me fifteen minutes and it has saved me more tumblers than I want to count.
My test band is a strip about half an inch tall and two inches wide, run where the lid covers it or on a scrap piece of the same stock. I am looking for a mark that is dark and even, not gray and patchy. When it comes up patchy I add another coat of compound and give it longer to dry before I touch the power setting. Chasing a light mark with more power first is how people burn through the thin wall of a tumbler, and once that happens the piece is scrap and the customer is waiting.
Step 5: Clean It Up and Log the Setup So the Next One Matches
Wash the compound off with warm water and a soft cloth, dry it, and look at it under a bright light at an angle. Compound left sitting in the engraving looks like a gray haze and it will rub off on the customer's hand. Tape residue comes off with a little rubbing alcohol on a rag.
Then write the settings down. Module used, focus height, power, speed, lines per inch, the tumbler brand and size, and which face of the design pointed up at the start. I keep a spiral notebook on the bench and it is the most valuable thing in the garage. A repeat order for the same tumbler becomes a five minute setup instead of a forty minute experiment.
If you land a batch, set up once and run all of them. The chuck does not move between pieces, the focus does not change, and the fifth tumbler comes out identical to the first. That consistency is the whole reason to own a rotary instead of a jig and a steady hand.
What Else Helps
A bench that does not move. My first bench was a folding table, and every time I leaned on it the engraving drifted out of focus. I bolted a sheet of MDF to a frame and screwed that frame to the garage wall studs, and half my wobble problems went away overnight.
The shop vac and the open window. Engraving compound and stainless dust both end up everywhere. I run the vac over the bench after every session and keep the window cracked with a small fan pulling air out of the garage. It is not a fume hood, but it beats breathing the dust all evening.
Scrap stock. Pick up a handful of cheap tumblers or a few from a thrift store and treat them as test pieces. Every new design, every new tumbler brand and every new compound gets tested on scrap first. The xTool RA2 Pro is repeatable once it is dialed in, but the dialing in is on you.
An organizer for the small parts. I bought a cheap plastic drawer unit and gave each module its own drawer, then one for tape, one for hex keys and one for spare compound. The whole thing sits on the shelf above the bench where I can read the labels without moving anything. It sounds fussy and it is not. When an order comes in on a Thursday night and I have one hour before bed, I want to open a drawer and start, not dig through a coffee can hunting for the ring stud.
Good light at the bench and a notebook you actually write in. I also keep a small square handy for checking that the module frame is sitting true to the enclosure, because a frame that is skewed will pull the engraving off line even when everything else is right.
If you are still deciding whether a rotary earns its bench space, I wrote two pieces that go with this one: a long-term look at how the RA2 Pro has held up in my garage, and a straight comparison of the rotary against turning tumblers by hand.
One setup, five tumblers, the same result every time
That is what the rotary buys you. If your tumblers still come out crooked, the fix is not a steadier hand. It is a chuck that holds the tube on its axis while you do something else.
Amazon Check Today's Price on Amazon →